Two years ago, I almost threw my editing monitor out the window.
I'd spent three hours color grading a vertical video in DaVinci Resolve shot on a Sony A7IV. The lighting was dialed in, the subtitles were sharp, and the 4K preview on my Studio Display looked immaculate.
I uploaded it to Instagram Reels from my phone. It looked decent. Then, to save time, I downloaded that Reel back to my camera roll and tossed it onto TikTok and YouTube Shorts.
Ten minutes later, I pulled up the video on my phone while sitting on my couch. It looked like someone had smeared petroleum jelly all over the lens. The text had blurry halo rings around every letter. The background shadows were breaking apart into muddy gray blocks. And every time I moved my hands on screen, my fingers turned into pixelated sludge.
It took me three months of digging through FFmpeg documentation, testing bitrates with local transcoders, and inspecting platform CDN streams to figure out what was actually happening.
Your video isn't blurry because the camera was bad. It's blurry because you're feeding your files into a meat grinder of cascading compression passes.
What Actually Happens When You Re-Download a Video
Most creators think that when they download a video from Instagram or use a Telegram bot to strip a TikTok watermark, they're getting their original video file back minus the logo.
That is completely wrong.
Social networks spend hundreds of millions of dollars every year on bandwidth bills. To keep mobile data streaming fast, their ingestion servers chew up your original file the second you upload it:
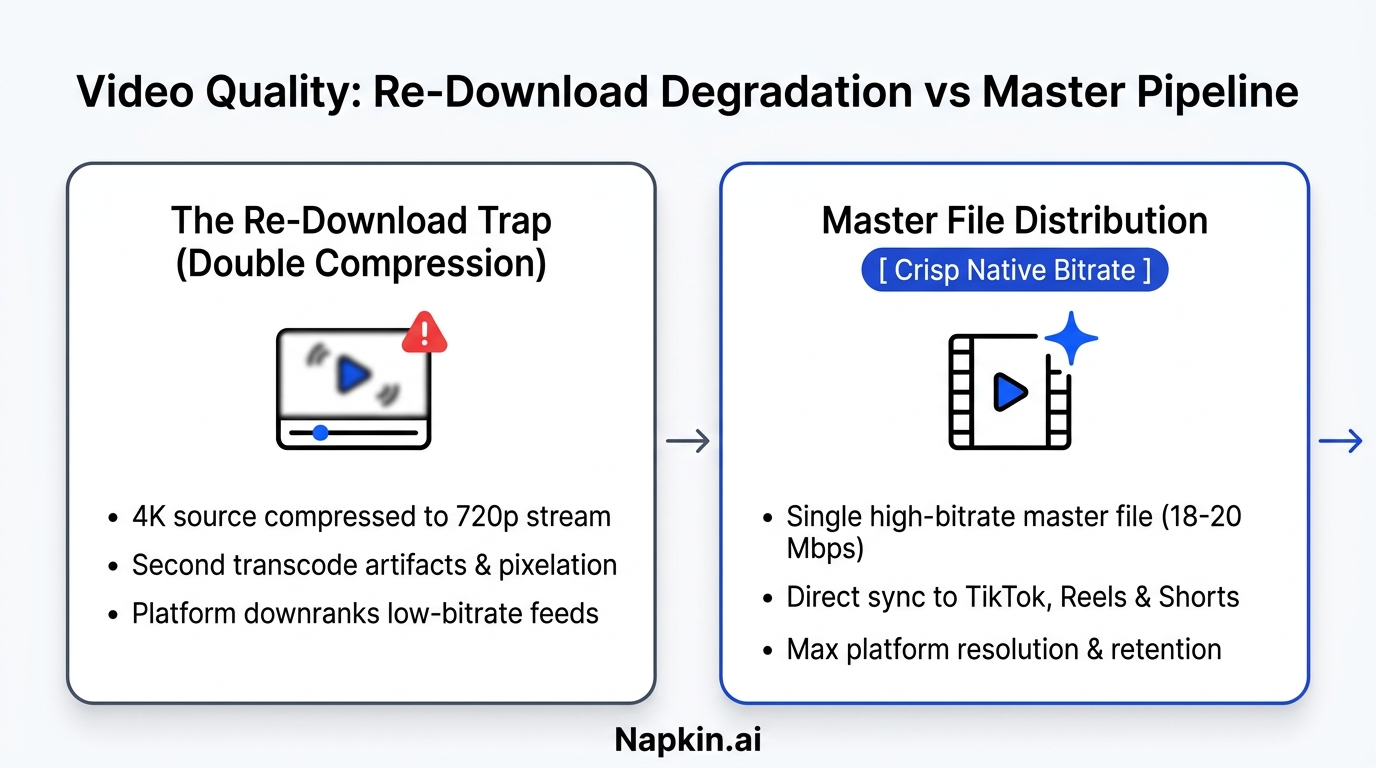
- The First Hack Job: Your editor exports a clean file at 30 or 40 Mbps. Instagram's servers take that file, throw away 85% of the data, and crush it down into a tiny 3.5 to 5.0 Mbps delivery stream formatted for 4G phones.
- The Re-Download Trap: When you hit "Save Video" or paste the link into a watermark remover, you aren't downloading your source file. You're downloading that crushed 4 Mbps delivery stream.
- The Second Crunch: You take that already degraded file and upload it to YouTube Shorts or TikTok. Their servers don't know the file has already been compressed. They treat it as an uncompressed master and run their full compression algorithms on it a second time.
- The Muddy Result: The second encoder tries to compress pixels that are already blurred and blocky from the first round. The two compression passes fight each other, resulting in severe generational loss. Subtitles blur, skin tones look plastic, and fast motion turns into soup.
If you remember only one rule from this article, let it be this: Never re-upload a file you downloaded from a social app. Always distribute from your original exported master file.
Real Platform Bitrate Limits in 2026
Every platform has its own internal ingestion limits. If you upload a file with an insane bitrate (like 100 Mbps ProRes), the server's downscaler panics and compresses it much harder than if you handed it an optimized file to begin with.
Here are the sweet-spot specs I've benchmarked after hundreds of test uploads across accounts:
| Network | Max Upload Dimensions | Target Export Bitrate | Optimal Codec | Framerate | Recommended Audio |
|---|---|---|---|---|---|
| Instagram Reels | 1080 x 1920 (9:16) | 14 – 16 Mbps VBR 2-Pass | H.264 / MP4 | 30 or 60 fps | 256 kbps AAC (48 kHz) |
| TikTok | 1080 x 1920 (9:16) | 18 – 20 Mbps VBR | H.264 / MP4 | 60 fps | 320 kbps AAC (48 kHz) |
| YouTube Shorts | 1080 x 1920 (9:16) | 20 – 24 Mbps VBR | H.264 or VP9 | 60 fps | 384 kbps AAC (48 kHz) |
| 1080 x 1920 (9:16) | 10 – 12 Mbps CBR | H.264 / MP4 | 30 fps | 192 kbps AAC (44.1 kHz) | |
| X (Twitter) | 1080 x 1920 (9:16) | 10 – 12 Mbps VBR | H.264 / MP4 | 30 or 60 fps | 128 kbps AAC (44.1 kHz) |
Notice something critical in that table: Not a single platform streams vertical video in 4K.
Exporting vertical video in 4K (2160x3840) is a waste of disk space. Worse, when you upload a 4K file to Instagram or TikTok, their server uses a quick, cheap downscaler to shrink it to 1080p. That cheap downscaler creates shimmering moiré patterns on fine shirt textures and jagged edges on your text overlays.
You get a sharper, crisper result by letting your computer's high-end graphics card do the 4K-to-1080p downscale during export, then handing the platform a flawless 1080x1920 file at 18 Mbps.
The Master File Workflow: How to Distribute Without Quality Loss
Instead of juggling downloads between phones, you want a single Master File Pipeline:
[Your Editing Software (Premiere / DaVinci / CapCut)]
                         │
                         ▼
[Export ONE Master File: 1080x1920 @ 18 Mbps H.264 Rec.709]
                         │
                         ▼
             [Creator Insights Dashboard]
    ┌────────────────────┼────────────────────┐
    │                    │                    │
    ▼                    ▼                    ▼
[Instagram API]     [YouTube API]       [Local Browser Agent]
(Original File)     (Original File)     (Direct upload to TikTok & X)
You export one clean master file to your desktop. You drop that file into Creator Insights.
From there, the platform routes the pristine file to Instagram, YouTube, and LinkedIn through official cloud APIs, while our companion Chrome extension handles direct uploads to TikTok, X, and Threads natively from your computer.
Every platform gets the fresh, first-generation export file. No watermarks, no double compression, no pixelated mush.
Exact Export Presets That Actually Work
Here are the settings I use every week. Copy these directly into your render queue:
Premiere Pro / Media Encoder
- Format: H.264
- Frame Size: 1080 x 1920 (Vertical 9:16)
- Frame Rate: Match sequence (30 fps is best for talking heads; 60 fps for gaming or screen recordings)
- Profile: High
- Level: 4.2
- Bitrate Encoding: VBR, 2 Pass (takes a little longer, but allocates data cleanly to fast hand gestures and movements)
- Target Bitrate: 18.00 Mbps
- Maximum Bitrate: 22.00 Mbps
- Color Space: Rec.709
- Audio: AAC, 320 kbps, 48000 Hz, Stereo
DaVinci Resolve Studio
- Render Format: MP4
- Video Codec: H.264
- Resolution: 1080 x 1920
- Frame rate: 30
- Quality: Restrict to 18,000 Kb/s (don't leave it on "Automatic")
- Encoding Profile: High
- Color Space Tag: Rec.709
- Gamma Tag: Gamma 2.4 (or Rec.709-A if you are on a Mac to prevent QuickTime player gamma wash)
- Audio Codec: AAC, 320 Kb/s
CapCut Desktop
- Resolution: 1080P
- Bitrate: Click "Customized" -> set to 18,000 Kbps (do not use "Recommended", it caps around 8,000 Kbps which is too low for fast motion)
- Codec: H.264
- Format: MP4
- Frame Rate: 30fps
Two Hidden Phone Settings That Secretly Ruin Your Uploads
Even with a perfect export file, your phone will quietly downgrade your videos if these two toggles are turned off. I've seen dozens of creators pull their hair out over this without knowing their app was the culprit:
1. Instagram: "Upload at Highest Quality"
By default, Instagram saves cellular data by downsampling your video uploads whenever your Wi-Fi or 5G connection fluctuates.
- Go to your Instagram Profile -> tap the hamburger menu in the top right.
- Tap Settings and privacy -> scroll to Data usage and media quality.
- Turn ON the toggle for Upload at highest quality.
- If this is turned off, Instagram will secretly push a 720p version of your file whenever you aren't on blazing fast fiber internet.
2. TikTok: "Allow High-Quality Uploads"
TikTok has the exact same trap tucked away inside the final upload screen.
- On the final screen before you post a TikTok (where you write your caption), scroll to the very bottom and tap More options.
- Scroll down and make sure Allow high-quality uploads is toggled ON.
- You have to check this regularly because TikTok app updates have a nasty habit of resetting this switch back to off.
Why iPhone HDR Footage Looks Blown Out on Android and Desktop
If you film on an iPhone 12, 13, 14, 15, or 16, Apple turns on Dolby Vision HDR by default.
When you watch the video on your iPhone screen, it looks stunningly bright and colorful. But when you cross-post that file to TikTok or LinkedIn, or when an Android user watches it, the video looks completely washed out, blindingly white, or drained of color.
That happens because most web browsers and social apps still rely on standard Rec.709 SDR color space. They don't know how to translate Apple's HDR metadata, so they clip the highlights and flatten the gamma curve.
The easiest fix is to stop shooting in HDR for social media:
- Open your iPhone Settings.
- Go to Camera -> Record Video.
- Scroll down and turn HDR Video OFF.
Your phone will now record in standard SDR Rec.709. Your footage will look consistent on iPhones, Androids, MacBooks, and Windows PCs without any color shifts or washed-out surprises.
Frequently Asked Questions
Does uploading from desktop give better quality than uploading from my phone?
Yes, absolutely. Desktop uploads through platform APIs or web interfaces bypass the phone's mobile data-compression filters and battery-saving throttles. The servers receive the full 18 Mbps file without cellular downsampling.
Why do some creators' Reels look so much sharper than mine?
High-performing creators export at exact platform dimensions (1080x1920) with VBR 2-Pass encoding, film under bright diffused lighting (which reduces video noise that breaks encoders), and never re-upload downloaded clips. Clean lighting alone can cut compression artifacts by half because the encoder doesn't have to waste bits on grainy shadows.
Is H.265 (HEVC) better than H.264 for cross-posting?
While H.265 offers better compression efficiency in theory, H.264 remains the universal standard for social media uploads in 2026. Some web browsers and older platform ingest nodes still hiccup on H.265 vertical profiles, occasionally causing audio desync or failed uploads. Stick with H.264 High Profile for 100% reliable cross-platform ingestion.